글

라벨이 TypeScript인 게시물 표시

Vite을 이용해서 React 프로젝트 생성하기

이미지
 "npx create-react-app ..."의 CRA의 개발이 중단됨에따라 다른 대안으로 React프로젝트를 생성해야 한다. 그중에 Vite가 있는데 CRA처럼 쉬고 간단하게 생성할수 있다. 1) 사전 준비 - 2025년 기준 Node.js 20+ 권장 (LTS). 버전 확인: $ node -v copy 2) 프로젝트 생성(이름: my-app ) 버전은 기본 최신(latest)으로 설정할 수 있으며 필요시 이전 버전으로 설정할 수 있다. (공식사이트의 Version참고 ) 대화형(템플릿 선택 프롬프트 표시): $ npm create vite@latest my-app copy 1) Window의 Git Bash로 생성 비대화형(바로 React + TS 템플릿): $ npm create vite@latest my-app -- --template react-ts copy pnpm / yarn 사용 시: $ pnpm create vite my-app --template react-ts copy $ yarn create vite my-app --template react-ts copy 3) 의존성 설치 & 실행 $ cd my-app copy $ npm install copy $ npm run dev copy 기본 개발 서버는 http://localhost:5173 에서 실행된다. 4) 생성 구조(요약) index.html : 진입 HTML src/main.tsx : React 엔트리 src/App.tsx : 샘플 컴포넌트 tsconfig.json : TypeScript 설정 vite.config.ts : Vite 설정 5) TypeScript 엄격 모드(선택) tsconfig.json 에서 "strict": true 권장. 6) 경로 별칭 설정(선택) vite.config.ts 예시: import { defineCo...
Vite TypeScript React에서 SVG 사용하기

이미지
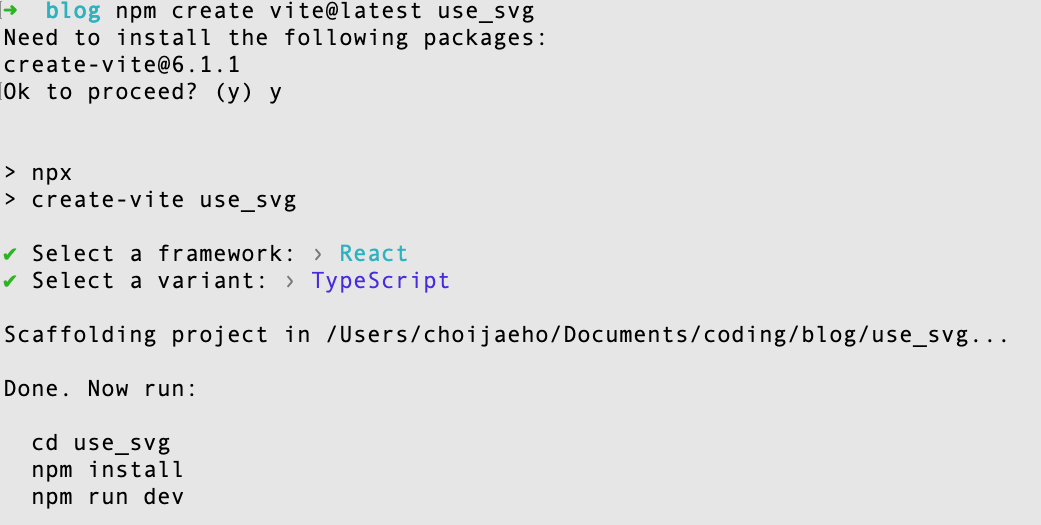
 해당 글에서 React(Vite : TypeScript)에서 svg를 사용하는 법에 대해서 확인하겠습니다. 1. vite을 이용해서 react 설치 install하기 - 해당폴더에 vite를 이용해서 React(TypeScript)를 설치합니다 $ npm create vite@latest [프로젝트명] copy 사진1) Vite를 이용해서 React 설치 2. svg 작성하기 사진2) 작성된 SVG 3. App.tsx에 추가하기 import { useState } from "react" ; import "./App.css" ; import CrownLogo from "./assets/crown.svg" ; // 추가된 코드 import reactLogo from "./assets/react.svg" ; import viteLogo from "/vite.svg" ; function App() { const [count, setCount] = useState( 0 ); return ( <> < div > < a href = "https://vite.dev" target = "_blank" > < img src = { viteLogo } className = "logo" alt = "Vite logo" /> </ a > < a href = "https://react.dev" target = "_blank" > < img src = { reactLogo } className = "logo react" alt = "...

TypeScript_JEST TypeScript로 Node TestCast만들기 : 커버리지(Coverage) 생성하고 사용하기 -4

이미지
  // jest.config.ts import type { Config } from '@jest/types' const config : Config . InitialOptions = { roots : [ '<rootDir>/src' ], transform : { '^.+ \\ .tsx?$' : 'ts-jest' }, testRegex : '(/__test__/.*|( \\ .|/)(test|spec)) \\ .[jt]sx?$' , moduleFileExtensions : [ 'ts' , 'tsx' , 'js' , 'jsx' , 'json' , 'node' ], verbose : true , collectCoverage : true , // 커버리지 사용 collectCoverageFrom : [ '<rootDir>/src/app/**/*.ts' ] // rootDir(루트 경로)에서 src/app폴더안 모든(**)폴더, 파일 및 모든 TypeScript 파일*.ts } export default config ; 커버리지를 사용한다고 하면 위 사진과 같이 테스트 결과가 다르게 나오는 것을 알수 있습니다.  HTML문서로 해당 테스트의 커버리지를 확인을 할수 있습니다.

TypeScript_JEST TypeScript로 Node TestCast만들기 : 에러상황을 테스트하기 -3

이미지
  // src/app/Main.ts import { parse , UrlWithParsedQuery } from "url" ; export class Fun { public static parseUrl ( url : string ) : UrlWithParsedQuery { if (! url || url . length <= 0 ) throw Error ( 'url is empty' ) // url이 비어있을시 에러발생 return parse ( url , true ); } public static toUpperC ( arg : string ){ return arg . toUpperCase (); } } // src/test/Main.test.ts import { Fun } from '../app/Main' describe ( 'Main test suite' , () => { // 해당 describe테스트에서 아래만 제외한다. test ( 'first test' , () => { console . log ( 'test work!!!' ) const str = Fun . toUpperC ( 'str' ); expect ( str ). toBe ( 'STR' ); // Fun.toUpper의 결과가 문자열 STR 이어야 한다 }); test ( 'parse URL' , () => { const url : string = 'http://localhost:3000/signup' ; const port : string = url . split ( 'localhost:...

TypeScript_JEST TypeScript로 Node TestCast만들기 : 실제 테스트 진행 -2

이미지
이제 연산작용을 적용해서 실제 JEST에서 테스트를 진행해 보겠습니다. 이전글 : TypeScript_JEST TypeScript로 Node TestCast만들기 : npm 프로젝트 생성 및 샘플 테스팅 -1 // src/test/Main.test.ts import { Fun } from '../app/Main' describe ( 'Main test suite' , () => { test ( 'first test' , () => { console . log ( 'test work!!!' ) const str = Fun . toUpperC ( 'str' ); expect ( str ). toBe ( 'STR' ); // Fun.toUpper의 결과가 문자열 STR 이어야 한다 }); }) 코드1) "STR"을 기대했지만 실제로 ""을 받았습니다. 실제 함수의 용도를 보면 들어간 문자열을 대문자로 바꾸는 기능이라고 할수 있는데 이 테스트에서 failed가 나왔습니다. 그럼 이제 실제 함수를 수정하도록 하겠습니다. // src/app/Main.ts export class Fun { public static toUpperC ( arg : string ){ return arg . toUpperCase (); } } 코드2) 하지만 실제로는 코드1처럼 간단하게 작성해서 테스트 하지 않습니다.  // src/app/Main.ts import { parse , UrlWithParsedQuery } from "url" ; export class Fun { public static parseUrl ( url : string ) : UrlWithParsedQuery { ...

TypeScript_JEST TypeScript로 Node TestCast만들기 : npm 프로젝트 생성 및 샘플 테스팅 -1

이미지
 JEST는 FaceBook에서 개발한 JavaScript 테스팅 툴입니다. 이는 TypeScript에도 적용이 가능하며 이번 시리즈로 설명하도록 하겠습니다. JEST공식문서 : https://jestjs.io/docs/getting-started 프로젝트를 만들겠습니다. 1. npm 프로젝트 생성하기 - 해당폴더에 npm 프로젝트를 자동 생성합니다. package.json파일 생성 $ npm init --y copy 이제 테스팅이 필요한 devDependencies를 설치하겠습니다. 타입스크립트를 작성하기 위해서 필요합니다. - 개발용으로만 사용할 npm 모듈을 설치합니다 : typescript,ts-node,@types/node $ npm install -D typescript ts-node @types/node copy 이제 실제 테스트에 필요한 JEST 모듈을 설치하겠습니다. - 개발용으로만 사용할 npm 모듈을 설치합니다 : jest, ts-jest, @types/jest $ npm install -D jest ts-jest @types/jest copy { "name" : "testtutorial" , "version" : "1.0.0" , "description" : "" , "main" : "index.js" , "scripts" : { "test" : "echo \" Error: no test specified \" && exit 1" }, "keywords" : [], "author" : "" , "license" : "ISC" , "de...

TypeScript Node에서 사용하기

 안녕하세요. 알렉스 입니다. 이번에는 실제 Linux(NodeJS)환경에서 TypeScript을 사용하도록 하겠습니다. 보통 TypeScript는 웹에서 동작을 할수 없습니다. 오직 JavaScript만 웹에서 동작이 가능한데 TypeScript를 JavaScript로 바꿔서 동작을 하는 것입니다. TypeScript설치 typescript npm을 설치합니다. (Globle) $ npm install -g typescript copy TypeScript버전 확인 typescript 버전을 확인합니다. $ tsc --version copy 타입스크립트를 작성시 확장자로 .ts를 붙입니다. 다만 JavaScript가 아니기 때문에 TypeScript를 JavaScript로 변경해야 합니다. 예로 'index.ts'파일을 만들었으면 이 파일을 'index.js'로 변경해야합니다. 그러기 위해서는 아래와 같이 터미널을 실행해 주면 됩니다. TypeScript를 JavaScript로 변경 node로 실행 가능한 JavaScript로 변경 $ tsc [TS file name] copy 여기서 매번 코드를 변경할때마다 위 CLI를 입력하는것은 매우 불편합니다. 따라서 watch를 이용하여 매번 수정마다 터미널에서 직접 입력할 필요가 없습니다. TypeScript코드를 수정시 Watch기능 코드를 수정시 해당 파일의 무결성을 확인하고 터미널에 문제가 생기면 알려준다. $ tsc [TS file name] --watch copy

TypeScript Class으로 타입 선언

이미지
class ProductDto { // product dto id : string ; name : string ; type : string ; created_year : number ; option : {[ key : string ] : OptionDto } } class OptionDto { // product dto내의 또다른 dto name : string ; desc : string ; count : number ; production : boolean ; } const product1 : ProductDto = new ProductDto () // class로 ProductDto타입의 변수 선언 product1 . id = "abc" ; product1 . name = "apple" ; product1 . type = "A" ; product1 . created_year = 123 ; console . log ( product1 ); product1 . option = { // option안에 key1을 키값으로 갖는 객체 생성 "key1" : { name : "test key1" , desc : "this is a test" , count : 10 , production : true } } console . log ( product1 ); product1 . option [ "key2" ]= { // option안에 key2의 키값을 갖는 객체 생성 name : "test key2" , desc : "this is a test2" , count : 13 , pr...

TypeScript Type 선언9 - never

이미지
 안녕하세요 . 이번에는 새로운 타입인 never에 대해서 알아보겠습니다. never는 그 뜻에서 절대로라는 뜻입니다. 즉 return값이 없다는 것입니다. 그럼 아래 코드를 보도록 하겠습니다. // 에러를 임의로 생성하는 함수 function createError ( message : string , code : number ){ // throw를 이용하여 error를 임의로 준다. throw ({ message , errorCode : code }); } // createError를 사용하여 임의로 에러를 발생 createError ( 'server error' , 500 );  위 코드를 보면 'createError'는 2개의 변수를 받습니다. message와 code입니다. 하지만 출력은 없습니다. 단지 throw 구문을 이용하여 에러를 출력합니다.   마지막에 createError('server error', 500)을 이용하여 에러를 생성한 결과는 아래와 같습니다. 그렇다면 createError의 return값은 있을까요? 사실 없습니다. try,catch구문을 사용하지 않는이상 사실상 createError함수가 실행되면 다음에 나오는 코드들은 무시가 되고 바로 에러를 출력하게 됩니다. // 에러를 임의로 생성하는 함수 function createError ( message : string , code : number ) : never { // throw를 이용하여 error를 임의로 준다. throw ({ message , errorCode : code }); } // createError를 사용하여 임의로 에러를 발생 createError ( 'server error' , 500 );  'never'가 없으면 기본값으로 'void'가 출력 type으로 지정이 됩니다. 하지만 never가 더 정확합니다. 실제로 c...